Showing posts with label geekery. Show all posts

17 August 2010

bombs away!

what's that you say? it's almost fall? time for bomber hats!!

credit where credit's due: the pattern comes from threadbanger.

ingredients assembled and pattern cut:


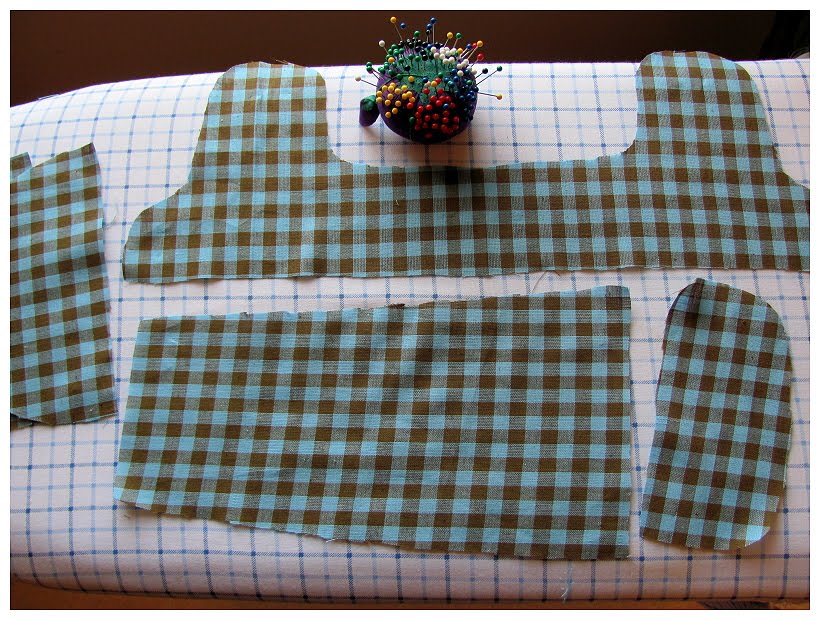
also, things that make me an idiot? on a list - not paying attention to how many of what pieces i need and cutting two of pieces i only need one of. such a waste!

pieces pieced together:


ready for tassels:


finish it off, and hat complete!


i didn't take a lot of photos of the process...i had already made one previously that didn't turn out nearly as well. i attempted to enlarge the pattern as i was cutting out, which made the hat WAAAAAY larger than needed. and crooked. see?


i promise it's not just his head that make the hat look strange. it's the hat that makes the hat look strange. :) anyway, this is me...signing off. i'm working full-time, schooling full-time and have a 15-hour-a-week practicum that i have to do...so you probably won't see me around these parts often. good thing kitchen ninja has our backs with updates.
dang!
j.me

31 December 2009

Ugly Cake, the Making of


Happy New Year ('s eve)!

Jams and Maggs are together and pissed at Tams! (Okay, not really. But she did steal our New Year's Ugly Cake idea...or just got to it first. Whatever).

So, to one-up the Kitchen Ninja, here's a much BETTER Ugly Cake (cuz you don't have to eat somebody's face to enjoy it). And also: a tutorial. Whee!


Step One: Make a cake. Any cake. Ugly Cake is not picky. We chose devil's food. (Maggs says: "Please enjoy my Gramma's antique mixing bowls and my lack of counter space").


Step Two: Gather your decorative toppings. Since we are not as ambitious as the Kitchen Ninja, we purchased our icing. Buttercream. Yum. Usually, we use decorator's icing to make freehand drizzle, but as we were feeling particularly lazy, we went for the candy topping: Milk Duds. The Reese's were for eating. They just wanted to be in the picture. Reese's are such attention whores.

Step Three: Turn cake(s) out of their baking pans. Usually, with cake baking, presentation is key. However, the key to a successful Ugly Cake is impatience. It's best not to wait until the cake is completely cool before inverting. Tonight, we were lucky and the cake came free of the pan without incident. Usually, it breaks into a million different-sized chunks ("all the better to build with," says Maggs), but since both cakes came out of their pans quite easily, we went for a traditional two-tiered structure rather than a more creative approach. If your cake falls into a million pieces, don't fret. Simply paste the chunks together in whatever formation you desire. Icing is the glue of the cake world. It can hide a multitude of sins.


Step Four: Ice that thing! Again, impatience pays off. It's best to ice the cake while it is still warm, so you can experience the frustration of icing slippage and runoff. This will also ensure that your candy topping won't completely adhere to the icing's surface.


(Okay...I guess the icing doesn't cover all sins).

Step Five: Decorate with your choice of toppings. The Milk Duds give it an unexpected chewy texture. We couldn't decide if that was a good thing or not...a tasty thing, yes. But not necessarily good.


(Topping slippage: an unexpected delight).


Step Six: Enjoy the finished product. Remember: the more bizarre the shape, the more fun it is to cut!

We hope this tutorial was a helpful one. Remember: if you are trying to make a cake, but are too impatient to do it properly, make an Ugly Cake. Just be sure to tell everyone you did it on purpose, or else they'll just think you're inept.

Jams & Maggs out!

Happy New Year!

28 December 2009

Press 'n Seal Portraits

HOLY JEEZ! Press'n seal is awesome. This past weekend the one thing I really wanted to do was make an embroidered portrait of Hugh Jackman as Wolverine. I know, totally boring, everybody's doing it, blah blah blah...


As I was looking through my crapacopia of stuff I found that I had no tracing paper or tracing pen. BAH. What to do? That's when Press'n Seal came to my rescue.


I put the press'n seal over a picture I liked. I then outlined it in permanent marker. I picked out a piece of fabric, press'n sealed the design onto it, put in in my embroidery hoop, and got to it.


The nice part about this technique is that you can also do some free hand work and add to simpler designs.


Here's the finished product - I think I'm going to turn him into a hot/cold compress cover.